Database On Kubernetes
An Introduction to Deploying your Database on Kubernetes
With the increase in adoption of DevOps principles, more and more applications are containerized and tools for managing these containers like Kubernetes are getting popular. This increase in the migration of Apps to Kubernetes (K8s) is also reflected in Stateful applications (eg. Database systems).
Overview
First Let’s understand the Basics:
For Deploying any application on K8s the most preferred way is the Declarative way where we declare our desired state of the application (eg. the Image which should be used for running the pods, Scaling of the pods to manage the load etc.) in a YAML file which is known as the Deployment File.
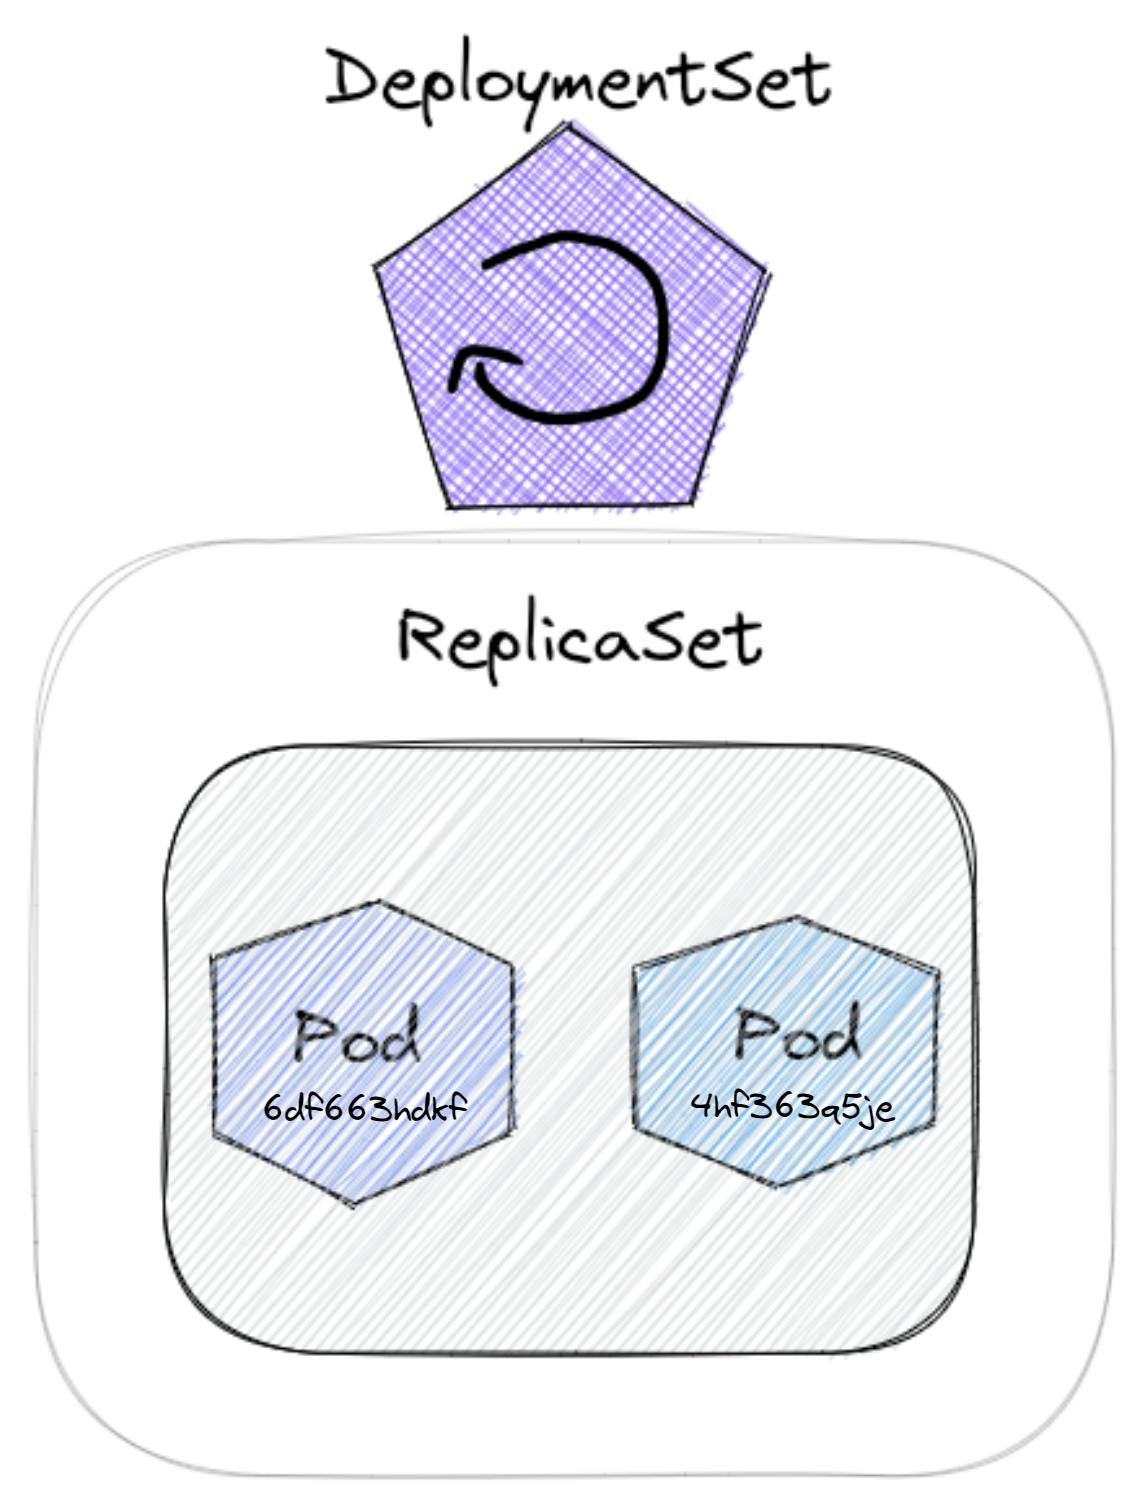
It also declares the ReplicaSet which is used to ensure that the desired number of pod replicas are running at any given time.
Basically, the deployments are useful for running stateless applications (like nodejs server) on K8s pods by declaring their desired state.
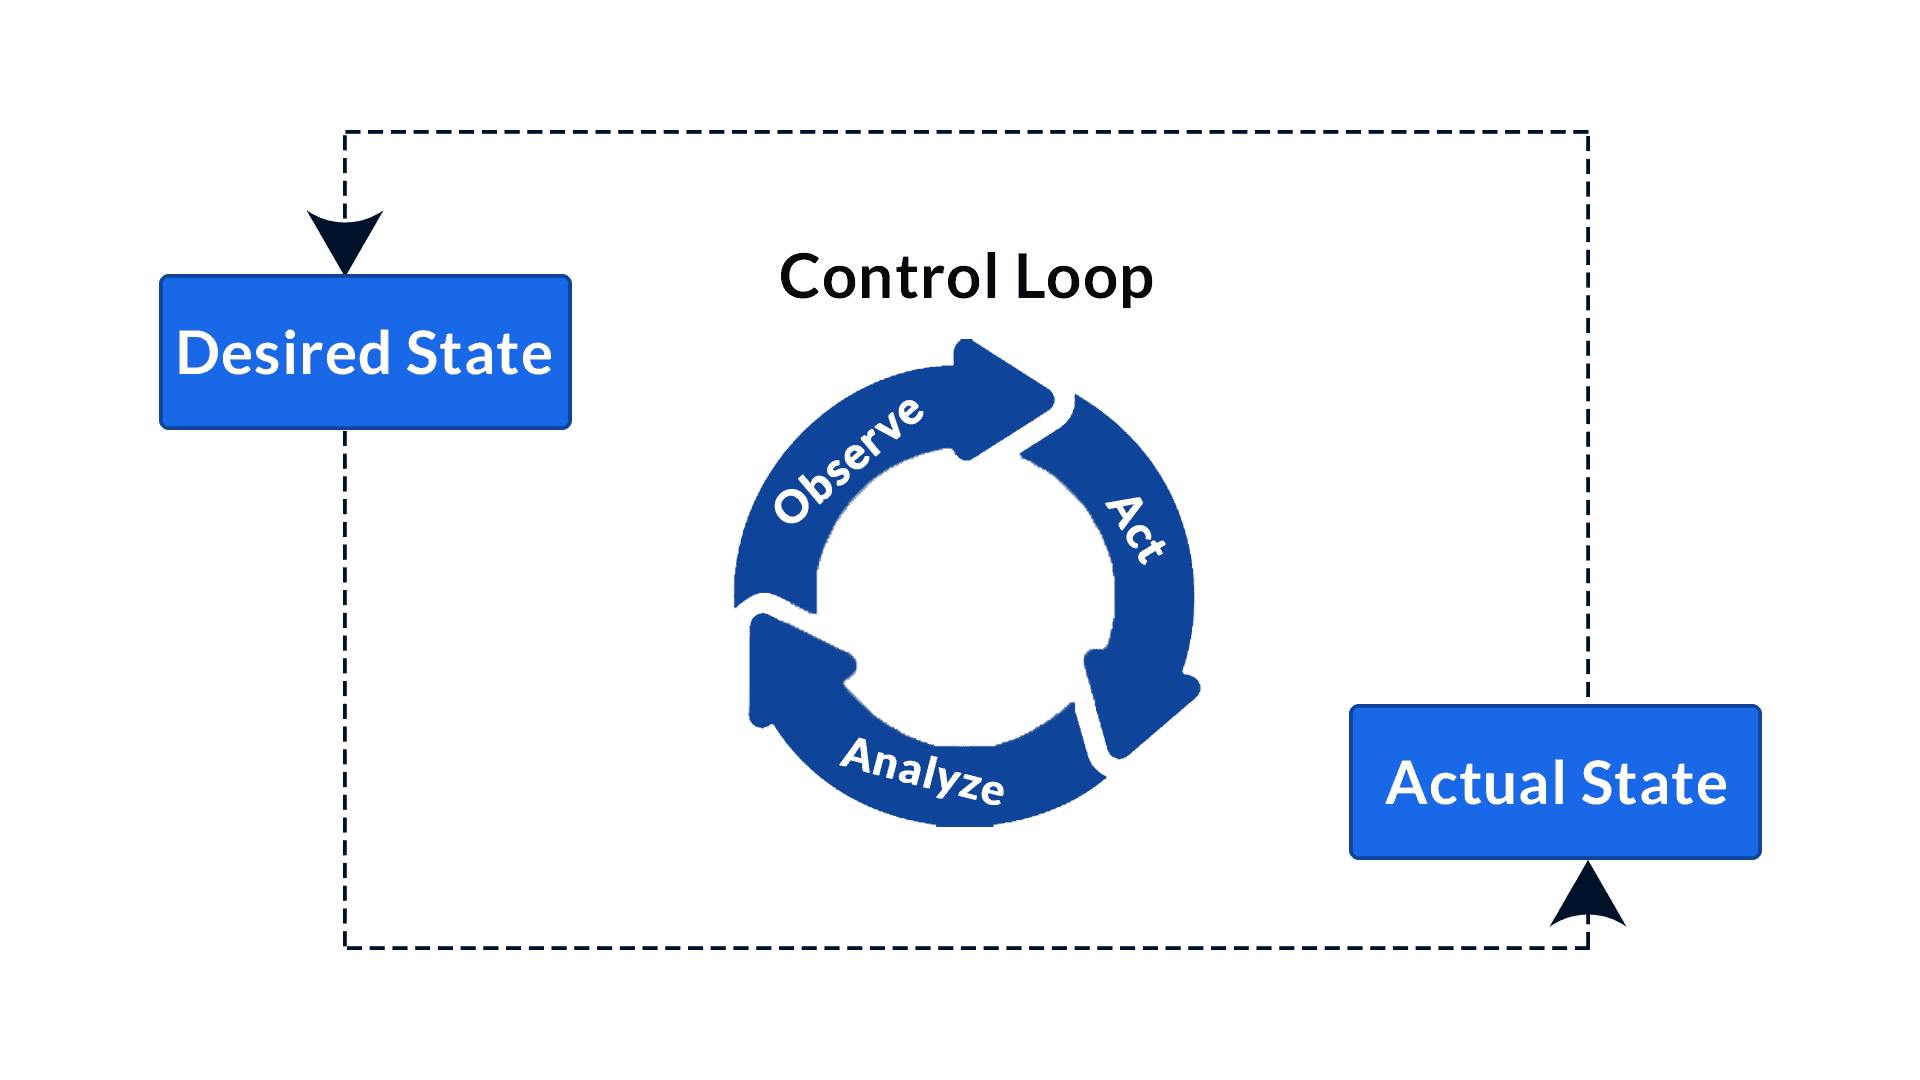
The Deployment makes use of the Contol-Loop mechanism provided by the Control-Manager to convert the Desired state of the App (as described in the Deployment YAML file) into the actual state.
Volume in k8s
When we have to deploy an application which stores Data (eg. a Database) we need a Persistent Storage area, because Pods can’t store Data on it. As soon as the pod dies all the available data in it is lost.
That is we need a Storage section which doesn’t depend on the lifecycle of Pod.
This is where the concept of Volume comes into play in K8s.
The volume can be divided into three sections:
Storage Class (SC)
- This is the Actual Storage Area where the files are stored in the main memory. It can be local Storage (on the hard drive) or External storage (Cloud-based)
Persistent Volume (PV)
It’s a component provided by K8s and is used to specify which type and amount of storage is needed. The given amount then gets attached like an external plugin to Persistent Volume.
PV is available to the whole cluster that is it’s not localized to a particular namespace.
Persistent Volume Claim (PVC)
PVC is used to claim a particular Volume as defined in Pod’s configuration. It exists in the same namespace as the pod
If the pod dies and a new pod is created in its place, then the PVC in the namespace attaches itself to the pod thus allowing access to the previously made Data in the Storage class
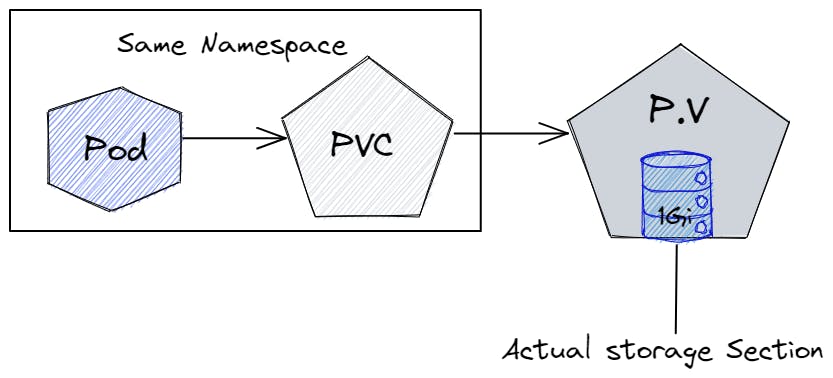
The lifecycle of the storage section isn't dependent on the lifecycle of the pod that is even if the whole cluster crashes, our data will survive in Storage Volume.
From the above configuration, we can observe that a Database can be deployed in that pod where the actual Data is safely stored in the Storage Class volume which is outside of the K8s namespace, with the help of PV and PVC and thus will not be affected if the pod dies and recreates.
In fact, we can use Deployment to run a single instance of database on a pod.
Understanding the Problem
But the drawback arises when we create replicas of the pod or try to scale up or scale down the DB Pods since all DB pods aren’t the same. If all the pods are of the same levels (same read-write permission to all the pods) then it will start creating data inconsistency (data is written from one pod, but not known by other pods)
Also even if we create a pod in a separate namespace it can still point to the same Storage class outside of the cluster (So actually the Database didn’t replicate)
That is all Database pods should have their own state and identity and can't be similar to each other.
From the above discussion, we can understand that replicating a stateful app is not as simple as replicating a stateless application.
So what's the Solution?
StatefulSet
StatefulSet is an inbuilt component of Kubernetes introduced in v1.5. This can be used in place Deployments for declaring and executing K8s pods.
According to K8s Documentation
StatefulSet manages the deployment and scaling of a set of Pods and provides guarantees about the ordering and uniqueness of these Pods.
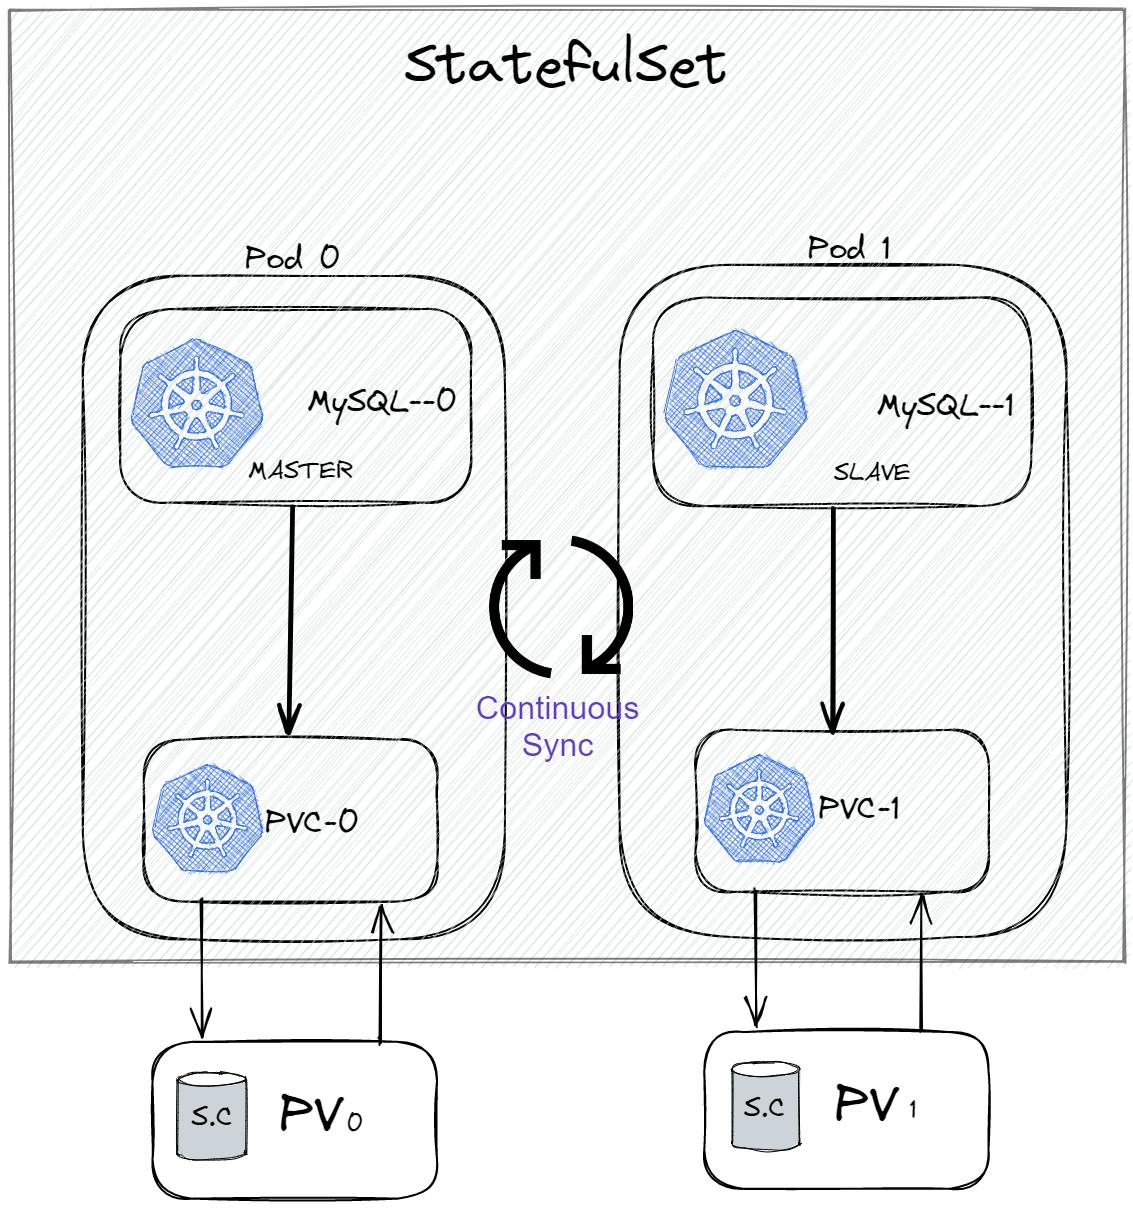
Unlike deployment, Statefulset manages each pod separately by creating separate PVC, PV and Storage classes for each pod. That is the pods use separate physical data storage (although they have the same date).
We can see this separation in pod identity where in deployment each pod gets random hash values. Here they are given a fixed name (podName—<$ordinal>) known as the Pod Identifier which remains the same even if the pod dies and is recreated.
The pod can be identified as a master pod or a slave pod based on its accessibility to data. If the pod can both read and write data to its storage class then it's identified as a master pod. On the other hand, if the pod can only read the data from its storage class then it's a slave pod. This type of pod management is performed to remove read-write conflict (as explained in the below section).
The pod's state and identity (whether it's master or slave pod) are stored on Persistent Volume, so that if the pod crashes and is recreated then the same identity and state are attached to our new pod through PV (since PV is outside the cluster so not affected by pod crash)
Here If suppose we declare to start 2 Pod replicas for our Database, Then it’s not going to start up randomly or simultaneously. Instead, first Pod-0 is fully Created Then Pod-1 is created. Pod-1 is then synchronized with Pod-0 through Continues synchronization. In fact now if we create another pod (pod-2) then it will synchronize its data with pod-1.
Also to remove redundancy and read-write conflict (multiple pods writing at the same time which leads to data inconsistency), the pods created don't have the same access level to their Data storage.
In our case, only Pod-0 or the master pod is allowed for both reading and writing operations and the rest of the slave pods can only read the data.
The data written by the master pod is then synchronized by slave pod-1 then pod-2 syncs with pod-1 and so on.
Demo Of StatefulSet
The main steps for setting up Database through StatefulSet include
Setting Up YAML File of StatefulSet for Database (in our case PostgresDb)
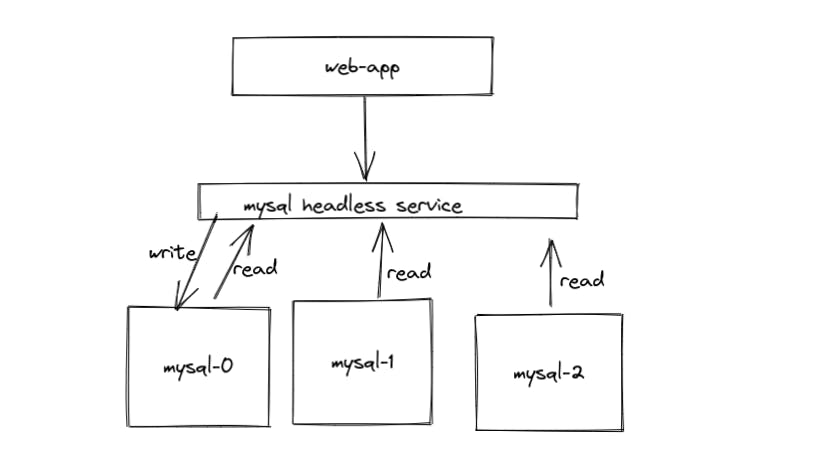
Setting up Service for the above resource which helps in connecting it to the outside world (by providing a single Stable IP address)
# statefulset.yml
apiVersion: apps/v1
kind: StatefulSet
metadata:
  name: postgres-database
spec:
  selector:
    matchLabels:
      app: postgres-database
  serviceName: postgres-service
  replicas: 2
  template:
    metadata:
      labels:
        app: postgres-database
    spec:
      containers:
        - name: postgres-database
          image: postgres
          volumeMounts:
            - name: postgres-disk
              mountPath: /var/lib/postgresql/data
          env:
            - name: POSTGRES_PASSWORD
              value: mysecretpassword
            - name: PGDATA
              value: /var/lib/postgresql/data/pgdata
  volumeClaimTemplates:
    - metadata:
        name: postgres-disk
      spec:
        accessModes: ["ReadWriteOnce"]
        resources:
          requests:
            storage: 10Gi
If we observe in the above YAML file webcam see that in Statefulset we define a volumeClaim template instead of specifying a fixed persistent volume claim (as done in deployment)
This helps in specifying separate PVC (and in turn separate storage) for each individual Pod.
Setting up Headless Service For Statefulset
# PostgreSQL StatefulSet Service
apiVersion: v1
kind: Service
metadata:
  name: postgres-loadbalancer
spec:
  selector:
    app: postgres-database
  type: LoadBalancer
  ports:
    - port: 5432
      targetPort: 5432
You can then use apply the command to execute the above yaml files
kubectl apply -f <file_name.yaml>
Which applies the StatefulSet and the Service to initiate the Postgres pods in sequential form
Use the following command to show the pods and services deployed
kubectl get all
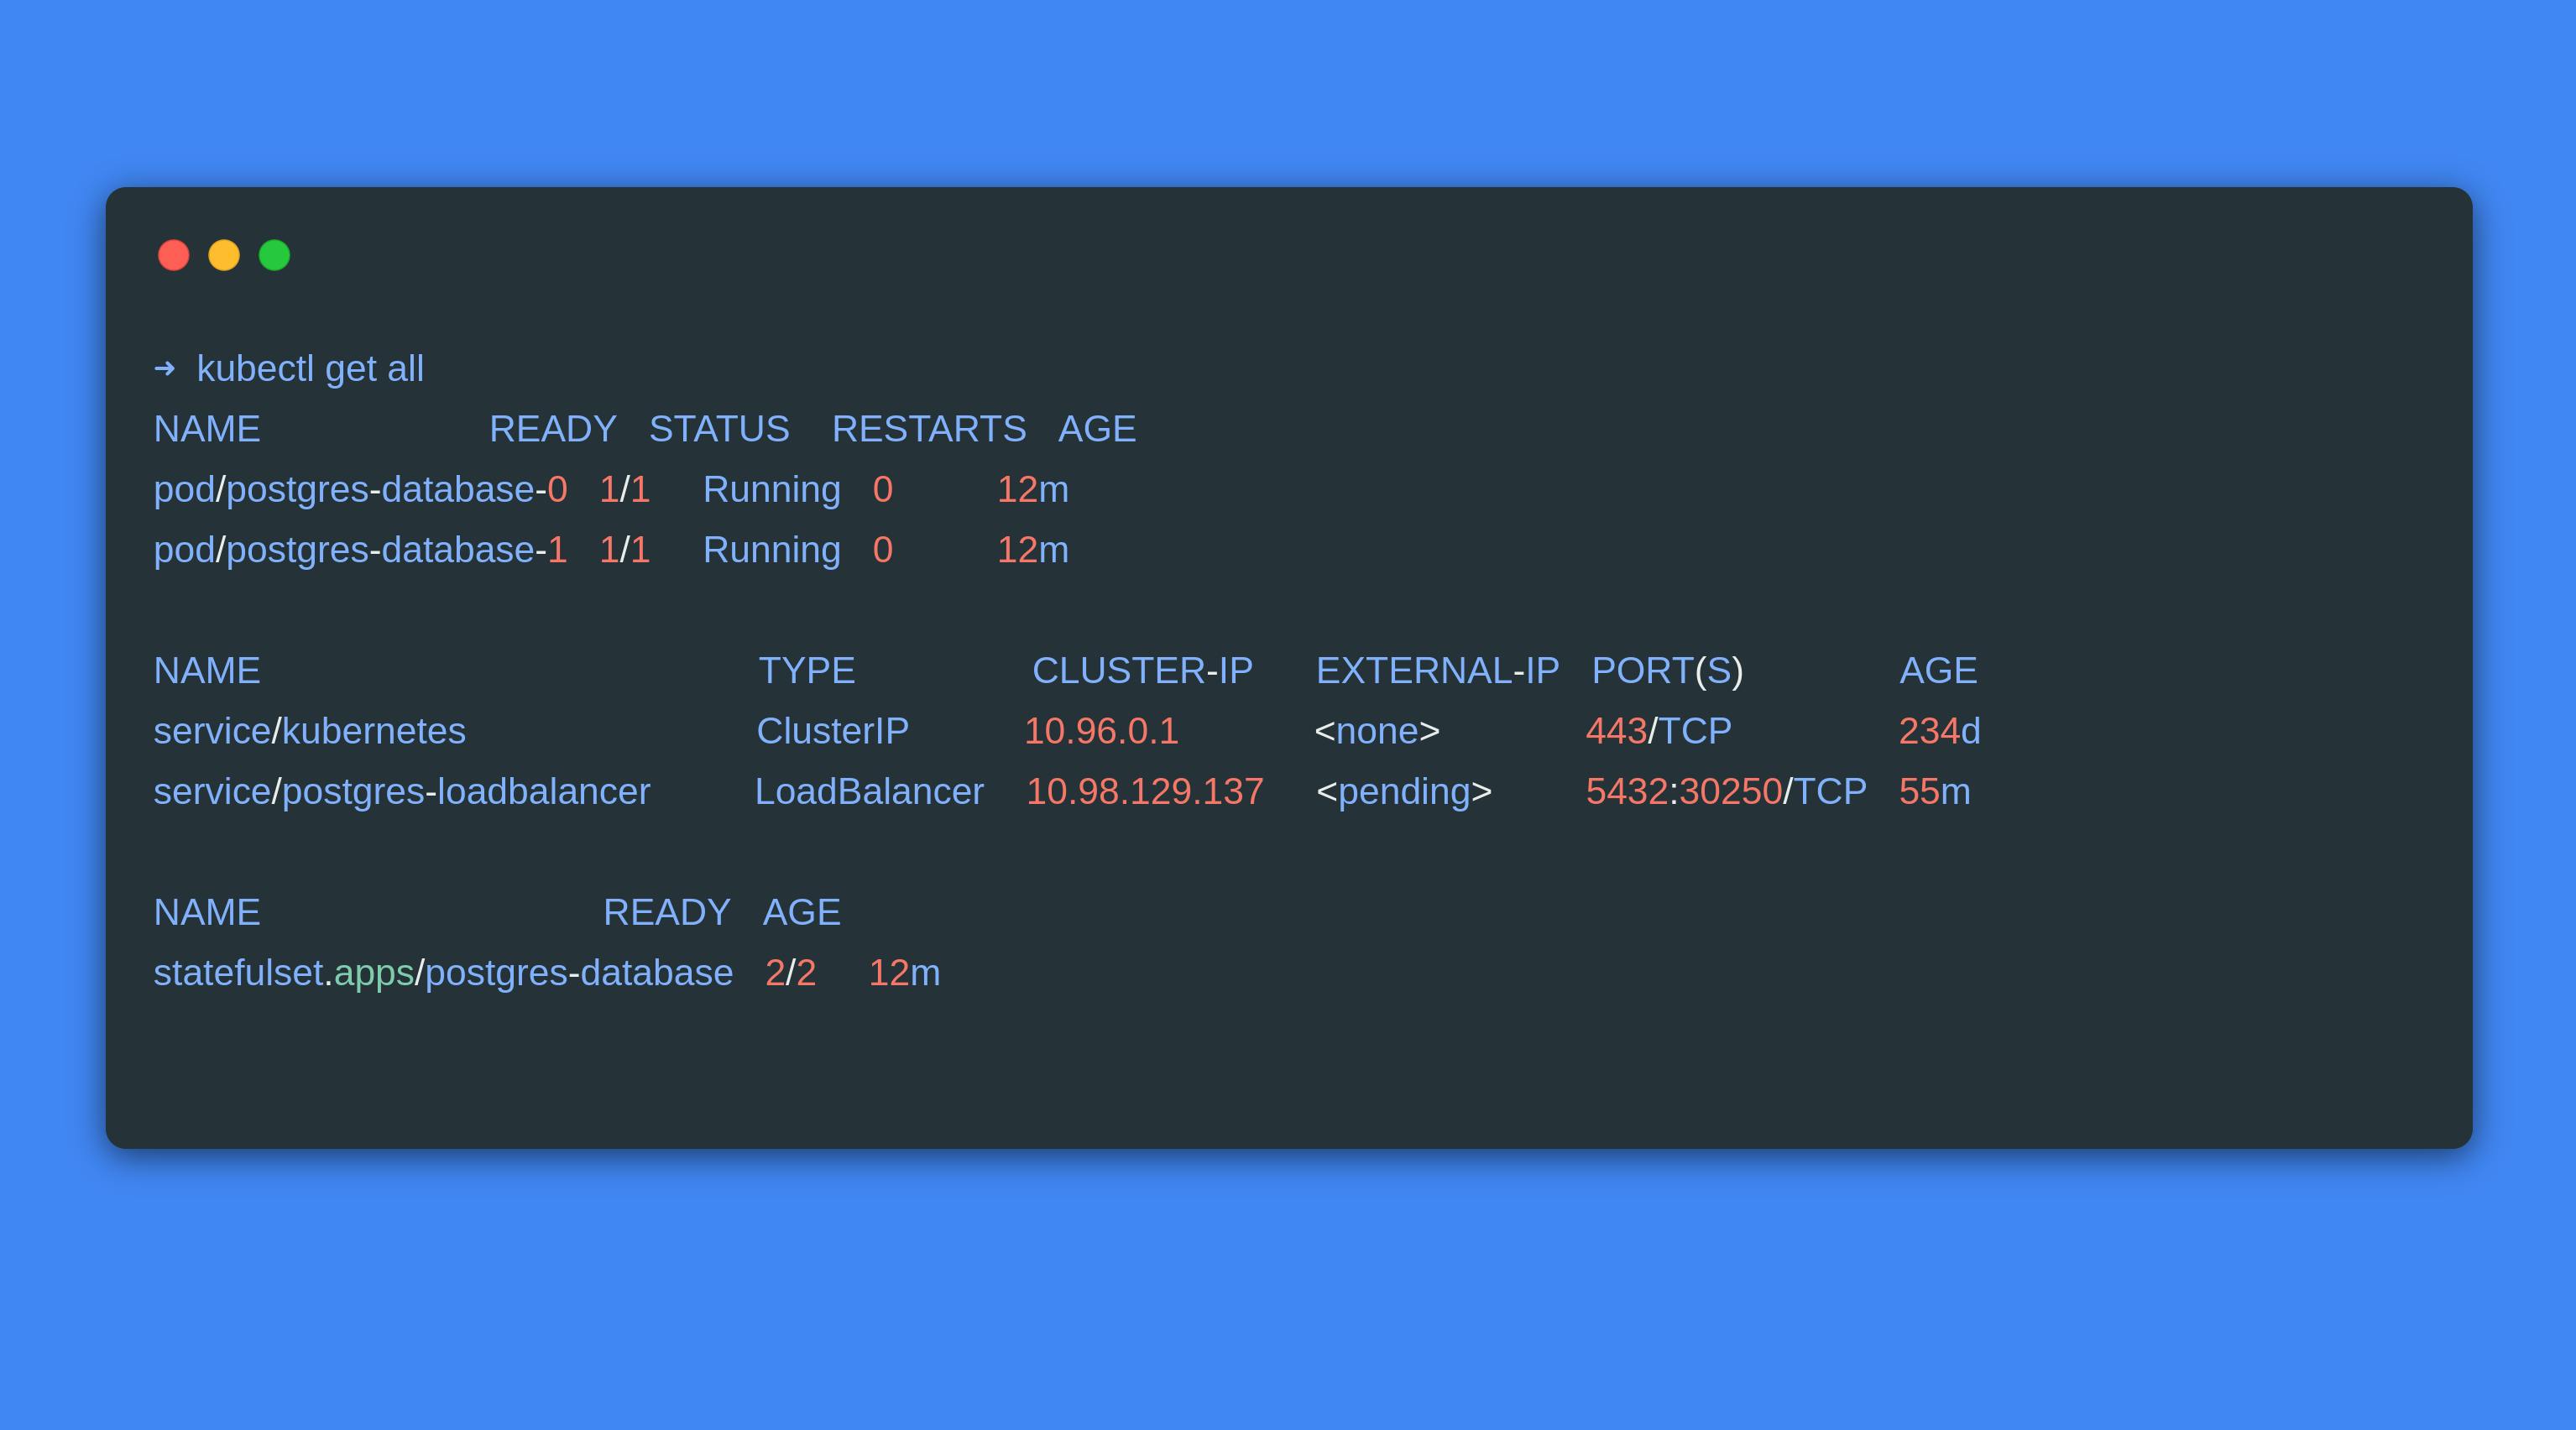
The StatefulSet pods seen above still require certain manual intervention since some of the k8s built-in features like control-loop mechanism can't be applied directly to pods deployed through StatefulSets
Welcome, The Operator!
A Kubernetes operator is an application-specific controller that extends the functionality of the Kubernetes API to create, configure, and manage instances of complex applications on behalf of a Kubernetes user.
The operator helps in automating the task of deploying the Stateful application and managing its entire lifecycle like scaling and upgrading of application.
The Operator works on the same principle of the Control-Loop mechanism, that is it regularly checks for changes in the application state, If a pod dies or some updates happen in the image, it manages that the update is properly applied to all the pods (That is it can be called as custom k8s controller for an app).
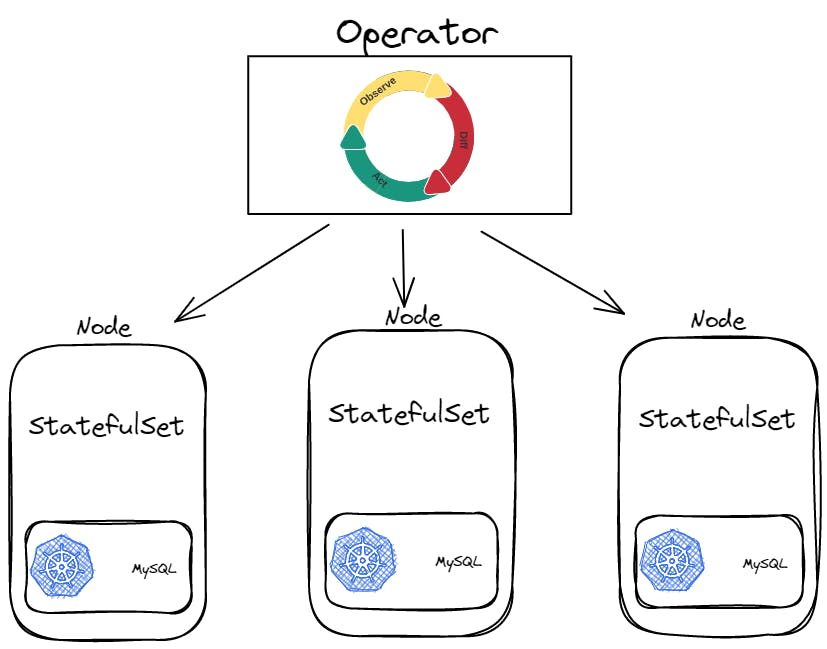
Basically, it's a Custom Resource that performs all the operations which are done by Kubernetes built-in resources for stateless applications.
It makes use of CRDs (or Custom Resource Definition) which helps us to make our own custom resources Other than that already provided by k8s (like deployments, Services etc).
Along with that it also needs domain-specific knowledge about a particular application that has to be deployed.
That is why we have different operators for different Apps
A few examples of operators used for managing Databases are :
We have operators like Portworx for managing MySQL database on k8s
CloudNative-Pg can be used for deploying Postgres Database on k8s.
You can use OperatorHub to search for any type of operator including Database.
In general, it’s possible to deploy your Database through StatefulSets only, but managing it in production and solving everyday tasks for your application, it's essential to use an app-specific operator for your Kubernetes cluster.
Few Resources I used for this blog:
redhat.com/en/topics/containers/what-is-a-k..
